Blog Description

A French-Inspired Garden and Home by Judith Stringham
Showing posts with label ornament. Show all posts

O is for Ornament

Wednesday, November 29, 2023

Since the Victorian Age ornaments on a Christmas tree have been a Christmas tradition in celebrating the most wondrous time of the year. O is for Ornaments in the list of Christmas traditions from A to Z written to add joy, love, laughter, beauty, nostalgia, comfort, sparkle, and meaning to the Christmas season. 


is for ornaments. 

Traditionally ornaments were used to decorate Christmas trees in England beginning in the reign of Queen Victoria. Shortly thereafter, the tradition spread to the United States. 


Ornaments vary from homemade to heirlooms and have evolved from just decorating a tree to decorating the house in other ways. 

H is for Heirloom

Wednesday, November 15, 2023

Christmas heirlooms are among families' most treasured Christmas traditions. And, dated annual Christmas ornaments are at the top of the list of Christmas heirlooms. Whether ornaments were handmade by grade school children or inherited from grandparents, Christmas is not the same without them.


is for Heirloom. 

Collectible dated annual ornaments often begin as gifts for special occasions. First Christmas for newlyweds, first home, or first Christmas for baby are among the top gifted Christmas ornaments with dates. 


Decorating a tree with ornaments began in Germany in the 1600s. By the mid-1800s, German artisans developed techniques to hand blow glass molds to create glass ornaments. 

Blue Wedgwood Tabletop Christmas Tree

Tuesday, November 15, 2022

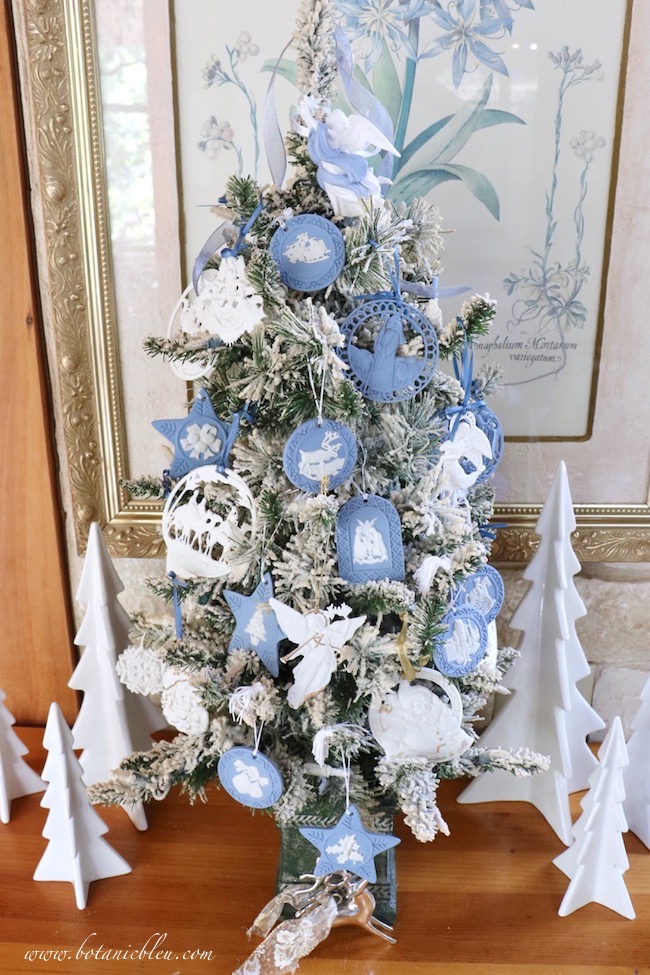
Wedgwood blue Christmas ornaments on an artificial tabletop flocked Christmas tree are perfect to use all around the house. Over the years, the tree has added Christmas cheer to my bathroom vanity, an entry hall table, a living room side table, and the top of the pine chest at the end of the fireplace. 


Christmas decorations in non-traditional Christmas colors
Through the years the collection of blue Wedgwood ornaments was expanded to include white Wedgwood ornaments to create a stunning blue and white Christmas tree. 

Gold Berry Leaves Ornament Makeover

Saturday, November 9, 2019


See how to transform a ho-hum metal cluster of leaves into a beautiful gold berry leaves cluster Christmas ornament you can use all over the house for the holiday season. 

You probably are not ready to start decorating your house for Christmas right now, but for all of us who like to do DIY projects, you can never start those projects too early. I finished transforming these gold berry leave cluster ornaments in late September, and still have more DIY projects in process.  

If you wait until December for DIY projects, you may find yourself in a time crunch like my sister-in-law one year. You may find yourself in the bedroom wrapping presents on Christmas Day and handing them out through a partially opened door... one at a time... to give to the recipient to open while she wrapped the next person's present. True story... 


ornament after makeover 


gold berry leaves ornament makeover after photo
I love how the makeover for a ho-hum ornament turned out. Bright gold berries, white over-sprayed gold leaves, and Noel ribbon turned the ornament into one of my favorites for this coming Christmas. 

DIY Polar Bear White Mohair Ornament

Monday, October 30, 2017

A Paper Series Post

Shh ... hhh ! 
Look away if you are not a do-it-yourself person, 

but DIY Christmas ornaments should be in progress NOW. 

At least gathering your ideas and your materials. 

Like for an adorable white mohair DIY polar bear ornament. 


adorable-white-polar-bear-mohair-diy-christmas-ornament

Eiffel Tower Christmas Tree

Thursday, December 22, 2016


During the holidays everything seems to be going according to plans, then... out of left field (or the North Pole) comes another idea. One you had not planned. Or you think you had not planned. One that just happens. A magical Christmas moment. 

An Eiffel Tower Christmas Tree 


Could it be the tree has been in the wings for years, just waiting to fly? 

Angel Ornament Tutorial

Tuesday, December 10, 2013

Christmas has always been such
an exciting time for me.


This year is even more exciting because
I am sharing a little handmade Christmas as
one of the 25 bloggers on


Links to all 25 fabulous creative ideas are
at the end of the post.
So, be sure to check out all of them.
Everyday I have been visiting all the others
and am so inspired by such original, beautiful ideas.

Unskinny Boppy is the handmade goodness before me, and
Atta Girl Says is the handmade goodness after me.

See all 25 on the tour.

You will be inspired to hand make
something special for your Christmas.
~~~~~~~~~~

Each Christmas I have a tree decorated with
angel ornaments,
doll-like angels, and angel wings.

Inspired by an angel ornament
I bought several years ago in Salado, Texas,
I decided to create some of my own design.

This wild-haired beauty is the result.

Materials needed

  1. muslin for the body
  2. wired ribbon for the skirt
  3. ribbon for the bodice
  4. ribbon for the wings and arms
  5. colored pens/pencils to draw eyes, lips, cheek rouge & gold paint pen to draw shoes
  6. yarn for hair
  7. ribbon, cord or thread for hanging loop
  8. metal embellishments for halo and ornament in angel's hands
Items not shown in photos
  1. cotton ball to stuff body
  2. Mod Podge and fabric glue

Refer to the photos below to see what the 
written directions are trying to describe.
TIP: Print the numbered directions and photos.
The fun is in creating an angel somewhat like the one I created. 
Use these directions as a guide...
Then... use your imagination and whatever materials you have to
create your very own unique angel ornament.
  1.  Cut a rectangular piece of muslin for the entire body and head to the size you want your ornament.  I cut my muslin about 4"x 2.5", making my ornament about 3.5" tall x 1.25" wide.
  2. Sew (using a 1/8"-1/4" seam) the rectangular muslin together, and position the long seam in the middle of the back of the angel. You now have a rectangular piece of muslin open at both ends that will be the angel.
  3. To create the feet, sew one end of the angel by sewing at a diagonal from each side to the mid-seam.  Still leave the other end open for now.
  4. Turn the fabric right side out (seams side in).  Fill the muslin with the cotton ball, stretching the cotton so it lies flat and fills the entire angel body/head.
  5. Sew the open end of the fabric together so that the top of the angel's head is slightly rounded.  I did this by hand, not the sewing machine.
  6. Use a double thread to wrap around the cotton-filled rectangle 2-3 times to create a neck and head. Tie the thread to secure it.  Make the head about 1/5 the length of the rectangular cotton-filled muslin.
  7. Sew a seam through the cotton-filled muslin, beginning at the middle of the feet at the bottom and stopping about 1/3 the length from the bottom of the angel. This creates the legs.
  8. Measure around the angel to determine how long a piece of ribbon to cut for the angel's bodice (solid teal ribbon in my angel) that will seen above the angel's skirt and extend below the skirt.  Add about 1/8"-1/4" to angel's circumference to allow for overlapping the ribbon.  Wrap the bodice ribbon around the angel, positioning the top of the bodice just at the neck you created.  Use fabric glue or Mod Podge to attach the bodice ribbon to the angel instead of sewing a seam.  I used fabric glue.
  9. Use wired ribbon (teal and gold patterned in my angel, but did not have anymore for the materials needed photo) for the skirt. Cut a length of ribbon about 2 1/2 times the circumference of the angel so that the skirt is full. Pull the wire on one side of the ribbon to create the gathers and wrap around the angel's waist, pulling the wire until the ribbon just meets at the back of the angel.  See the MATERIALS LIST photo #2 that illustrates gathering the ribbon. Turn each end of the wired ribbon under so that there is no raw seam showing. By hand, stitch the wired ribbon at the back of the angel to secure it to the angel's waist.  You may need to put a stitch underneath where each arm goes to hold the skirt in place at the waist.
  10. Stitch the two ends of the angel's skirt together by hand.  If the ribbon's width hangs below the angel's feet, hem the bottom of the skirt (I had to turn my ribbon up...see the photo).  Sew one stitch in 4-5 places to keep the hem turned up in place.
  11. Cut two lengths of ribbon/cord/thread for the angel's arms.  I used the same sequined ribbon for the arms and the wings.  I was able to fold the ribbon repeatedly until I had the size needed for the arms.  Sew each arm to the top of the bodice ribbon.  Then stitch the two arms together where the angel's hands would be.
  12. Sew an embellishment (I used a gold colored Christmas tree) to the angel's hands. 
  13. Make a bow from ribbon for the wings.  Stitch the bow above the waist through the bodice ribbon attaching the wings to the muslin where the knot of the bow is located.
  14. Now comes the fun!  Create the angel's hair by gluing (I used Mod Podge) yarn to the top and back of the head.  The yarn I used has multi-colored threads going wildly in all directions. 
  15. Use Mod Podge to attach an embellishment (I used a gold colored metal snowflake) as a halo on the angel's head.
  16. Sew a hanging loop on the back of the angel's head.
  17. Use a gold paint pen to paint shoes on the bottom of the angel's legs.  I only painted the shoes on one side, the front.
The wild hair is my favorite part of this angel!


18. Create the angel's face.
  • Use a pen (I used a blue sharpie) to paint eyes.  
  • Use a pen (I used a rosy-colored gel pen) to paint lips.
  • Use a colored pencil (I used a red-colored grading pencil) to create lightly rosy cheeks.
I practiced all of the pen/paint parts on a piece of scrap muslin 
before I painted the face and shoes.
I tried several red pens/pencils before choosing the ones I used.

Close ups of the angel...


Here she is hanging with another angel that someone gave me several years ago.
Perhaps the angel on the left will be inspiration for another angel project on another day???
~~~~~~~~~~~~~~~~~~~~~~~~~~~~~~~~~~~~~~~~~~~~~~~
❧
An idea ... for those who need a craft for girls to do... 
Make the bodies of the angels in advance.
Then let the girls add the ribbon bodices, skirts, wings,
hair,  embellishments, painted shoes, and painted faces.
~~~~~~~~~~~~~~~~~~~~~~~~~~~~~~~~~~~~~~~~~~~~~~~~~~
If you need help with following my directions creating the angel ornament,
send me an email to botanicbleu1@gmail.com, and I will
try to answer your questions.
❧
~~~~~~~~~~~~
Here is the schedule for the entire tour...


Friday December 6

Saturday December 7 Sunday December 8
Monday December 9
Tuesday December 10


Eiffel Tower - Real & Faux

Monday, September 9, 2013

What one thing says Paris? 
la Tour Eiffel


A Moment in France

Is there anything more exciting than
seeing the Eiffel Tower for the first time?


Then there is the excitement of going up the Eiffel Tower!


Impatiently waiting in the long line that
winds back and forth, back and forth, inching
forward little by little.

Looking up at the underside of the
beautiful ironwork...


Then...
Reaching the very top with the love of your life...
Nothing more romantic or memorable...
Feeling the brisk breeze, seeing all of Paris below you,
... far, far below you,
 excitedly pointing out landmarks,
wondering aloud to one another,
"Do you see that? Over there?"
as you point with your arm outstretched.
Faces turning toward each other,
laughing, smiling, eyes dancing, as you discover this
new world together.


On the first level above the street, the sights are
more recognizable, sounds from the River Seine and
the streets reach your ears.

Looking out over the Seine River and Paris...


So, my love for the Eiffel Tower began.
No two photos in today's post
were made at the same time.
They were lovingly collected over the years.
Similarly, I have collected other images of
la belle Tour. 


A few pieces in my collection
sit on my computer desk/hutch.

Nothing elaborate, or expensive.
A photo of friends with the Eiffel Tower
in the background...
A postcard from Paris in the colors I love...
A Traveler's Notebook with French trip travel notes...
A Christmas ornament from Target...
An imprinted sepia card...
A small signed engraved print bought from a
bookseller's stall along the Seine River...

Recently I made a small
bleu Eiffel Tower hanging tag
with my new French script rubber stamp,
an old favorite Eiffel Tower rubber stamp,
a small scrap of watercolor paper,
deckle-edge scissors,
a narrow white silk ribbon, and
a white hang tag.


Here's how you can make one, also.

Begin with stamping both sides of a white hang tag
using a French script rubber stamp.
Ink the edges.

Then stamp a small piece of watercolor paper
with an Eiffel Tower stamp.
Use a piece of watercolor paper
smaller than the hang tag.

Trim the edges of the Eiffel Tower stamped
watercolor paper with deckle-edged scissors.
 My favorite crafting scissors.

Glue the Eiffel Tower to
the hang tag, but leave
the edges free for a 3-D effect.

Attach a narrow silk ribbon.


Voilà...

So simple, yet so français...


Golden moments and golden memories...
the real thing.
❦
~~~~~~~~~~
Please join me at these inspiring sites...
MONDAY

TUESDAY
~~~~~~~~~~~~~

Bird Ornament Tutorial And The Winner Is...

Thursday, September 5, 2013

The first anniversary of 
the Botanic Bleu blog was
August 26, 2013.

In celebration, I had a Give-Away 
for a white ceramic message board 
with a fleur-de-lis. 

❦
Congratulations!
The winner is 
Lisa @
Life Away From The Office Chair

Lisa is a North Carolina blogger who shares 
recipes, crafts, and random thoughts.
You have to see her Best Fried Pickle recipe!

Hop over to Life Away From The Office Chair 
and leave a congratulatory comment for Lisa on 
winning the white ceramic message board.  

Then come back to read how to create 
Bird Ornaments.
~~~~~~~~~~

More inspiration from The Graphics Fairy...


Using Microsoft Word and 
free (yes, free... can you believe it?) 
images from The Graphics Fairy, 
I created four small bird ornaments. 

Supply List
  1. Free images from The Graphics Fairy
  2. Computer Color Printer
  3. Canvas Cloth, 8.5" x 11"
  4. Mod Podge glue
  5. Art Mat Board
  6. Paper Cutter
  7. Ribbon, four 6-inch lengths 
  8. Hot glue gun


Here the little birds sit before getting their hanging ribbons. 


Step 1: Create the four bird images to print.
Using landscape in Page Set Up, I copied the four images from 
The Graphics Fairy and pasted them onto the same 
Microsoft Word document.  


Bird print #1: 
External Parts of a Bird
The Graphics Fairy image was black and white. 
To change its color, I used the Picture formatting options in
 Microsoft Word. 

There are so many kinds of computers, but there is a 
strong possibility that Microsoft Word 
works similarly on all brands of computers. 
I use a MacBook Pro laptop. 


TIP: Make a copy of the downloaded image. 
Make your changes to the COPY so if you 
are not happy with the results, you can start 
over with another COPY of the downloaded image. 

First, click on the bird print you want to change. 
You should be able to see an outline around the image. 
A "Picture" submenu appears in the Formatting Palette.
Above is what the screen looks like on my computer. 

The very first option is titled, "Recolor." 
Its drop-down menu has three more submenus, 
"Color Modes, "Dark Variations," and "Light Variations." 
I could not get a picture of those. 
The third submenu titled, "Light Variations" has 
several options.  I chose "Accent Color 3 Light." 
You know, I just discovered this feature within 
the past week, and I've been using Microsoft Word 
for years and years... 
So much to learn... 


I added a Box behind the image and 
added a colored line Border around the image. 
I did not see a list of what the external numbered parts are on a bird. 


Bird print #2: 
Tulip Soap 
The Graphics Fairy image is exactly as you see. 
All I had to do was to resize it. 
The canvas cloth texture makes these photos extra special. 
The colors seem much brighter on the canvas cloth than 
the colors looked on the practice paper pages. 


Bird print #3: 
Bird with Mistletoe
Superimpose the bird image over the mistletoe image, 
both from The Graphics Fairy. 


Use Microsoft's "Ordering" options and 
adjust "Transparency" to allow the bottom image 
to show through the top image. 


Bird print #4: 
Bird with Fleur-de-Lis 
The Graphics Fairy has links to sets of free fonts. 
One set is called, "Best French Free Fonts." 
The French font is all fleur-de-lis characters. 
Create a Text Box and fill it with fleur-de-lis. 
Create a Rectangle Box behind it as a border. 
Use "Layer" options to place the bird image 
over the Text Box which is over the Rectangle Box. 
Create colored line Borders around the Rectangle Box 
and the bird image. 
Use "Transparency" to show the Text Box image 
through the bird image. 

Step 2: Print the four birds. 
After formatting the bird images, print practice pages 
to check placement, colors, and sizes. 
Then print out these fine-feathered friends on 
canvas cloth paper from Office Depot. 
I printed all four prints on one canvas cloth page. 
I use an HP Photosmart C5500 printer. 

Let the printed canvas cloth images dry for several hours, 
preferably overnight. 


Notice the packaging descriptions:
brilliant color printing 
quick drying and fade resistant 

When I glued the birds to the art mat boards, 
I used a slightly damp heavy paper "shop" towel to smooth down 
the canvas and to clean off stray Mod Podge glue 
that was on the canvas from my fingers. 
The color did not run, 
and it did not rub off onto the paper towel. 
No compensation from Office Depot; 
just thought you would like to know. 


Step 3: Attach the four canvas birds to art mat boards. 
Cut out the four bird rectangles from the canvas cloth. 
Trace around the perimeter of the four birds 
onto art mat board. 
Use a paper cutter to cut the four art mat boards 
that will be the backs of the images. 
The mat board makes a nice stiff board for 
hanging on a tree, the wall, on a hook, etc... 

I glued the bird prints to the BACKs of the mat boards, 
allowing the fronts of the mat boards to show as the backs 
of the bird canvas ornaments. 
This is a nice finish on the back of the ornaments. 
Cover the back of the mat board and 
the back of the bird-printed canvas cloth 
with Mod Podge glue. 
Smooth down the bird canvas cloth image 
onto the art mat board BACK making sure 
there are no air bubbles and 
all the edges are firmly attached. 
Allow to dry. 


Step 4: Attach hanging ribbons to backs of the art mat boards. 
Find the center of the back of each of the small canvas bird/art mat boards. 
Use a hot-glue gun to attach both ends of a 6-inch ribbon at the 
marked center back.
 I glued my ribbon ends about one-quarter inch to one-half inch below the 
back top edge of the bird canvas/art mat boards.


This allows the ribbon to be folded down behind 
the bird canvas ornament in case you want to display 
the bird canvas ornament  
on a small easel instead of hanging it. 


Hang or prop and enjoy! 

Missed the tutorial on how to make the mossy hydrangea heart? 
Details are in the post entitled Hydrangeas and French Script

That little blue Eiffel Tower in the background 
will be discussed in a tutorial in an upcoming post. 

Oh, what fun I am having! 
❦
~~~~~~~~~~

Hydrangeas and French Script

Sunday, August 25, 2013

Hydrangeas, blue, and 
French Script ~ 
Three of my favorite things 


A mossy heart with a single dried hydrangea blossom on French script 


is perfect hanging from the tail of a white bird bottle.


The first moss heart with a dried hydrangea I made 
was sold in my Country French Christmas sale last year. 
That one had French script paper as its background. 
This one has blue French script stamped on white paper. 


The hanging ornament was made using 
a wooden disk from a craft store, 
a dried hydrangea blossom from my mother's yard, 
a French script rubber stamp, 
and sheet moss. 


After stamping the French script onto white paper,
I cut out two circles and used Mod Podge matt glue 
to attach them to the wooden disk. 

Since I am not handy with a drill, 
I used a nail to make a hanging hole in the disk. 

A pastry heart cutter was just the right size to use 
as a pattern to make the heart from sheet moss. 
Since Mod Podge glue dries clear, 
it was perfect to glue the mossy heart to the disk, 
and then to glue the dried hydrangea to the moss. 


The hardest part was painting a gold rim 
around the disk using a gold paint pen. 


This moss heart with a single dried hydrangea blossom 
from my mother's garden is not for sale. 

It is a reminder to me of things I love. 
❦
~~~~~~~~~
Feel like you are experiencing déjà vu? 
This post was first published at 6:00 a.m. on August 25, 
but the content disappeared during the day sometime. 
Three comments were still visible, 
but no content.  

Has this happened to anyone else? 
What do you suppose I did? 
~~~~~~~~~~
My blogiversary Give-Away is 
going on through Sept. 2, 2013. 
If you would like to win a ceramic message board, 
see how to enter at the link below.
This giveaway is over. 
Blogiversary Give-Away
Some lucky reader is going to win
the fleur-de-lis decorated board
just in time to write fall messages.
~~~~~~~~~~