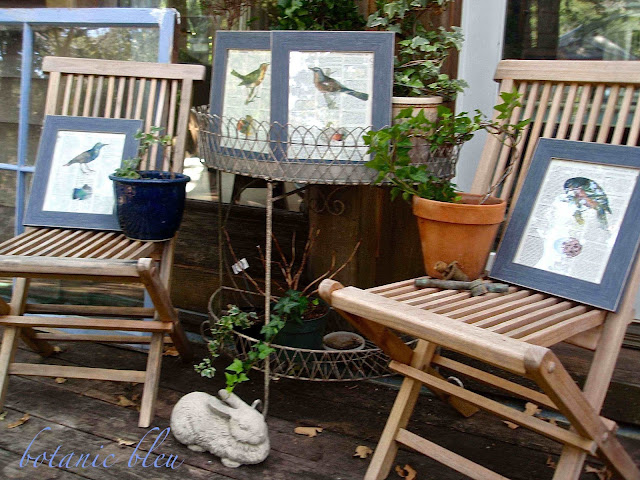
We have all seen the beautiful
Bird Prints
in catalogs right now.
And we have seen the prices for those beautiful prints...
Sometimes into several hundreds of dollars...
Especially if you want a matched pair...
Graphics Fairy inspired me to make my own bird prints
using her free graphics for colorful birds, feathers, and eggs.
Supply List
Remember the old 1973 Western Garden Book dictionary
I used to make butterfly boards?
Its pages are also perfect for creating bird prints.
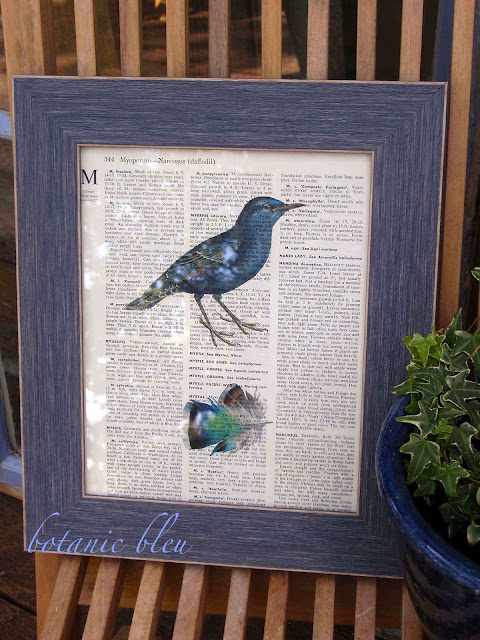
Dappled shade and sunlight cause the trees and blue sky
to reflect in the glass hiding the bird's true coloration.
Without trying to purposely create a work of art,
my photos turned into collages.
I am enjoying how these photos look.
Somehow I know that I could never have created
these on purpose, nor do I think I can recreate this effect.
Such a marvelous unexpected result that makes me smile.
Step 1 - Select pages on which to print the images.
I chose to use pages with text only on which to print
the free Graphics Fairy aviary images, saving the dictionary pages
with detailed drawings for more butterfly boards.
Using an Exacto knife, cut out the pages from whatever book
you choose to use as the pages on which to print your birds.
Using the bird graphics as guides,
choose dictionary pages that complement your birds.
For instance, place the large alphabetical letter in the margin
of a dictionary on the opposite side of the bird's head.
Step 2 - Cut mat board on which to attach the prints.
Craft stores, such as Michaels, have large 16"x20" mat boards
that they will cut to whatever size you want.
An 8"x10" board is a good size since
ready-made frames come in that size,
both giving a large selection of ready-to-use frames and
keeping the price low by avoiding custom framing.
I was able to get four 8"x10" mat boards
from the 16"x20" board.
Tip
Instead of framing the prints, the mat board can be the
border for the printed bird.
In that case, have your mat board cut so that
a border will exist around the printed page.
For a 2" border around an 8"x10" print,
get a mat board cut to 12"x14".
Step 3 - Print the aviary images.
To get both a bird and a feather or
both a bird and an egg on the same page,
copy the Graphics Fairy bird image
and paste it into a Microsoft Word document.
Use the software tools to resize the bird
to fit on the page where you want it.
Then copy a Graphics Fairy feather or egg
and paste it onto the same Microsoft Word document.
Once again, use the software to resize and
to position the feather/egg where you want it.
Here is a bird and feather on the same page ready
for you to save to your computer.
You may use it to print so you do not need
to create your own page.
Thank Graphics Fairy for her free incredible images.
Place the dictionary page into the printer and
print the bird/feather/egg images directly onto it.
I use an HP Photosmart C5500 printer
and a MacBook Pro computer.
This little Mac computer can do anything!
Well, almost...
Trim the edges of the printed page to match your mat board.
The sunlight makes these two prints look like they are sparkling.
Or like they have star constellations on their wings.
What a metaphor!
Without this photo, I would never have thought
of the image or phrase, "star constellations on their wings."
But, now I am remembering it to think about again...
Tips
If you plan to make a set of prints,
either choose two bird prints that
are facing opposite directions, or
use your computer's software to "reverse"
one of the bird images
so they will face each other when hung.
Print practice pages on plain paper
to check the size and position of your images.
Place the practice page in front of your dictionary page.
Then hold the two pages up in front of
a bright lamp. You will be able to see
the dictionary page through the practice page and
know how your final printed page will look.
Follow your printer's directions about how to position
paper for printing. Some printers print paper face-side up,
but the majority I have used, print paper face-side DOWN.
Step 4 - Mount the printed page to the mat board.
Spray the front of the mat board with Spray Mount glue.
I tried attaching the dictionary pages to mat boards two different ways...
with Mod Podge glue and with Spray Mount adhesive.
For me, the Spray Mount works better.
The Mod Podge glue tends to have dry spots
that causes the dictionary page to be loose with air bubbles in places.
I did not want to put Mod Podge on the front of
my printed bird pages, just on the back.
The Spray Mount glue creates a solid connection
with no air bubbles IF you carefully rub the page
as you attach it to the mat board.
Tip
The Spray Mount glue is unforgiving.
Position your printed page perfectly the first time
because you cannot reposition the page once it is
pressed onto the glue.
I begin with matching the top left corner,
then carefully holding the dictionary page off the glue,
aligning the top right corner.
Then I lay the dictionary page down and begin
smoothing the page with downward motions
as I lay the page onto the mat board.
Work downward from the top and outward from the center.
Step 5 - Display the finished print.
If you made an 8"x10" print,
there are many ready-made frames.
All you have to do is open the back,
insert the print, and hang the print.
Michaels had their frames on sale...
buy one, get one free!
This project just kept
getting more and more economical.
Once again the sunlight and trees reflected in the glass
giving this bird print an even more colorful pattern than he really has.
The frames are just the style and color
that fit the bird prints I selected,
and the frames also complement my house.
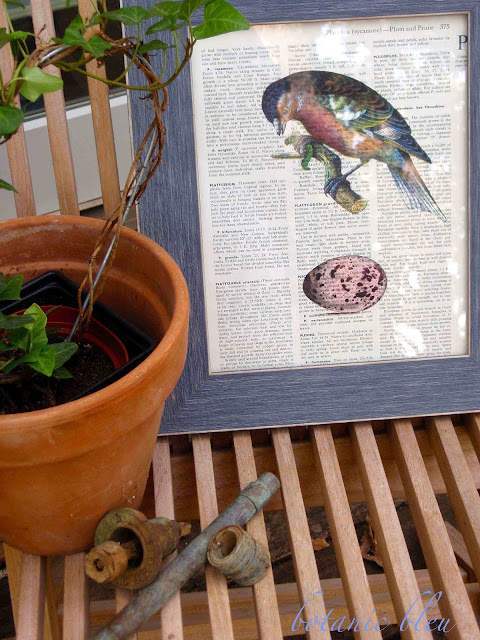
This view shows the real colors in the bird print better.
I love how you can see the dictionary print through the bird and the egg.
Transparency that shows the beauty of both the images and the words...
Transparency... a life-style worth living, and worth being...
Tip
An even more money-saving way to display
your print is to attach a ribbon to the back of the mat board.
Position the ribbon ends about 4-6" apart and
glue down the ends with a hot glue gun.
Then hang the board.
No frame needed.
What started out as a little project to create bird prints inexpensively
has turned into a revelation of creative images, thoughts, and memories for me.
~~~~~~~~~~
WEDNESDAY
Sometimes into several hundreds of dollars...
Especially if you want a matched pair...
using her free graphics for colorful birds, feathers, and eggs.
Supply List
- 8"x10" mat board, as a back for the bird print
- Aviary images from Graphics Fairy
- Page from an old book, preferably a gardening book of some kind
- Color printer
- Spray Mount glue
- Photo frame - 8"x10"
- Exacto knife
- Ruler
- Ribbon for hanging, optional
- Hot glue gun, optional
Remember the old 1973 Western Garden Book dictionary
I used to make butterfly boards?
Its pages are also perfect for creating bird prints.
Dappled shade and sunlight cause the trees and blue sky
to reflect in the glass hiding the bird's true coloration.
Without trying to purposely create a work of art,
my photos turned into collages.
I am enjoying how these photos look.
Somehow I know that I could never have created
these on purpose, nor do I think I can recreate this effect.
Such a marvelous unexpected result that makes me smile.
Step 1 - Select pages on which to print the images.
I chose to use pages with text only on which to print
the free Graphics Fairy aviary images, saving the dictionary pages
with detailed drawings for more butterfly boards.
Using an Exacto knife, cut out the pages from whatever book
you choose to use as the pages on which to print your birds.
Using the bird graphics as guides,
choose dictionary pages that complement your birds.
For instance, place the large alphabetical letter in the margin
of a dictionary on the opposite side of the bird's head.
Step 2 - Cut mat board on which to attach the prints.
Craft stores, such as Michaels, have large 16"x20" mat boards
that they will cut to whatever size you want.
An 8"x10" board is a good size since
ready-made frames come in that size,
both giving a large selection of ready-to-use frames and
keeping the price low by avoiding custom framing.
I was able to get four 8"x10" mat boards
from the 16"x20" board.
Tip
Instead of framing the prints, the mat board can be the
border for the printed bird.
In that case, have your mat board cut so that
a border will exist around the printed page.
For a 2" border around an 8"x10" print,
get a mat board cut to 12"x14".
To get both a bird and a feather or
both a bird and an egg on the same page,
copy the Graphics Fairy bird image
and paste it into a Microsoft Word document.
Use the software tools to resize the bird
to fit on the page where you want it.
Then copy a Graphics Fairy feather or egg
and paste it onto the same Microsoft Word document.
Once again, use the software to resize and
to position the feather/egg where you want it.
for you to save to your computer.
You may use it to print so you do not need
to create your own page.
Thank Graphics Fairy for her free incredible images.
Place the dictionary page into the printer and
print the bird/feather/egg images directly onto it.
I use an HP Photosmart C5500 printer
and a MacBook Pro computer.
This little Mac computer can do anything!
Well, almost...
Trim the edges of the printed page to match your mat board.
The sunlight makes these two prints look like they are sparkling.
Or like they have star constellations on their wings.
What a metaphor!
Without this photo, I would never have thought
of the image or phrase, "star constellations on their wings."
But, now I am remembering it to think about again...
Tips
If you plan to make a set of prints,
either choose two bird prints that
are facing opposite directions, or
use your computer's software to "reverse"
one of the bird images
so they will face each other when hung.
Print practice pages on plain paper
to check the size and position of your images.
Place the practice page in front of your dictionary page.
Then hold the two pages up in front of
a bright lamp. You will be able to see
the dictionary page through the practice page and
know how your final printed page will look.
Follow your printer's directions about how to position
paper for printing. Some printers print paper face-side up,
but the majority I have used, print paper face-side DOWN.
Step 4 - Mount the printed page to the mat board.
Spray the front of the mat board with Spray Mount glue.
I tried attaching the dictionary pages to mat boards two different ways...
with Mod Podge glue and with Spray Mount adhesive.
For me, the Spray Mount works better.
The Mod Podge glue tends to have dry spots
that causes the dictionary page to be loose with air bubbles in places.
I did not want to put Mod Podge on the front of
my printed bird pages, just on the back.
The Spray Mount glue creates a solid connection
with no air bubbles IF you carefully rub the page
as you attach it to the mat board.
Tip
The Spray Mount glue is unforgiving.
Position your printed page perfectly the first time
because you cannot reposition the page once it is
pressed onto the glue.
I begin with matching the top left corner,
then carefully holding the dictionary page off the glue,
aligning the top right corner.
Then I lay the dictionary page down and begin
smoothing the page with downward motions
as I lay the page onto the mat board.
Work downward from the top and outward from the center.
Step 5 - Display the finished print.
If you made an 8"x10" print,
there are many ready-made frames.
All you have to do is open the back,
insert the print, and hang the print.
Michaels had their frames on sale...
buy one, get one free!
This project just kept
getting more and more economical.
Once again the sunlight and trees reflected in the glass
giving this bird print an even more colorful pattern than he really has.
The frames are just the style and color
that fit the bird prints I selected,
and the frames also complement my house.
This view shows the real colors in the bird print better.
I love how you can see the dictionary print through the bird and the egg.
Transparency that shows the beauty of both the images and the words...
Transparency... a life-style worth living, and worth being...
Tip
An even more money-saving way to display
your print is to attach a ribbon to the back of the mat board.
Position the ribbon ends about 4-6" apart and
glue down the ends with a hot glue gun.
Then hang the board.
No frame needed.
What started out as a little project to create bird prints inexpensively
has turned into a revelation of creative images, thoughts, and memories for me.
Vintage 1973 garden dictionaries, vintage bird prints, blue-gray wood frames,
red clay flower pots, and old copper water sprinkler fittings sitting
on a French-style teak folding deck chair bring memories
of loved ones and good times to my mind.
Yes, a picture is worth a thousand words... and
a thousand memories.
❦~~~~~~~~~~
My blogiversary Give-Away is
going on through Sept. 2, 2013.
Deadline for entry is 12:00 midnight (CDT).
If you would like to win a ceramic message board,
see how to enter at the link below.
 |
| Blogiversary Give-Away |
Some lucky reader is going to win
the fleur-de-lis decorated board
just in time to write fall messages.
~~~~~~~~~~
Please join me at these inspiring sites...
MONDAY
TUESDAY
WEDNESDAY
~~~~~~~~~~~~~


